


The A-Z Strip Lights Guide
Posted by Navdip Gahir on 15th Oct 2025
LED Strip Lights can be a bit of a minefield even if you’re only after a simple setup. Which tape will be best? What driver do I need? How do I get smart lighting?
Unless you know what you’re doing, there are a lot of moving parts to LED tape.
Luckily though, we are experts in all things LED strips, so what we have put together here is a complete start to finish guide on everything you might need for your tape install, what it’s for and if you need it or not.
The LED Tape Itself
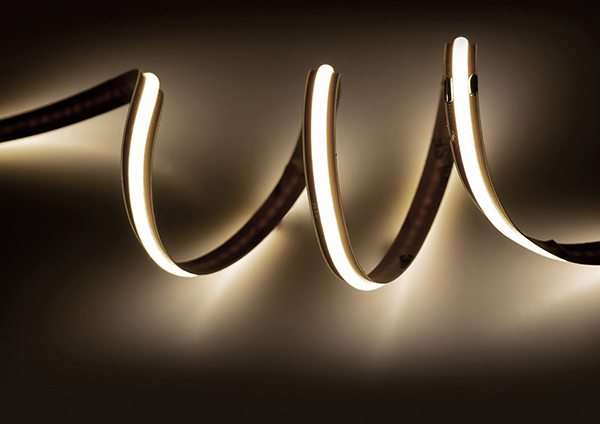
This one speaks for itself - the LED tape, or LED strip lights - are the thing that will actually light up and provide the illumination.
Our primary range we offer here at WLED is our Aon COB range. These provide a seamless, single beam of light that looks much better than the conventional dotted LED tapes from years gone by.
You can buy LED tapes in a range of wattages, starting at 8W per metre and going all the way up to 21W per metre. Generally speaking, the more light you want your tape to emit, the higher you’ll want the wattage to be.
For instance, if you’re looking to add some ambient lighting to your shelving, you’ll be fine with 8W as you only need a bit of light. If however you’re looking to use LED tape as your main source of lighting in any given room, you’ll definitely want to be looking at 14W per metre or higher.
The choice of colours will also play a part. You can get single colour - which emits one colour (though these are available in a choice of colours), dual colour, which can emit anything between warm white 3000K and cool white 6000K, and RGB which can emit any combination of red, green or blue, giving you millions of potential colours.
The main factor behind deciding on your colour is where you’re planning on using your tape. If you want to use them in relaxation areas, then you’ll want warmer tones, whereas if you’re looking at spaces like the kitchen or bathroom, then you’ll probably want to go on the cooler side.
It’s also worth noting at this point that if your setup involves multiple lengths joined together, then don’t worry - our team can sort out all the cutting and soldering for you so that all you need to do is simply fit it when it gets delivered to you.
Controlling Your New Tape
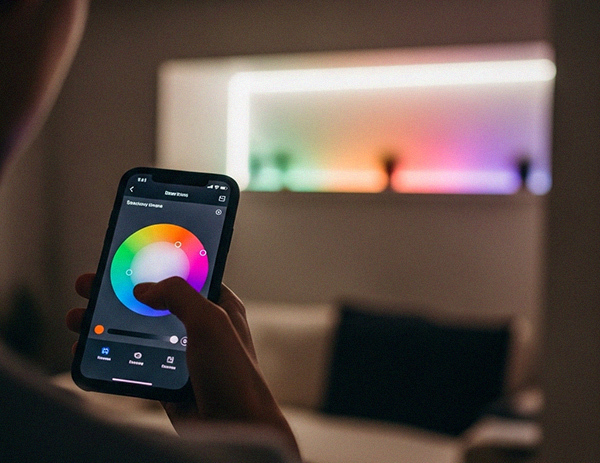
The next thing you’d need isn’t necessary for every tape install - if for example you have single colour tape, then you don’t need one of these, but if you’ve picked out some tape that can, say, change colour, then you will almost certainly need a Controller.
While we have many to choose from, we’d very strongly recommend our Easilight 5-in-1 Smart Receiver, on the simple basis that it works with every type of tape except for LED Pixel tape, and can be used either online or offline.
In a nutshell, it covers 99% of all strip light needs.
Let’s start with this: you can use the 5-in-1 receiver with single colour, dual colour, RGB, RGBW/RGBWW and RGB+CCT tapes. The tape simply connects via the tail at the end of the strip directly into the output end of the receiver.
Now if you’re not interested in getting your strips online, you can just pair it to a compatible remote controller, and it’s as simple as that.
If you do what to get your lights online however, all that’s required here is a Zigbee Gateway. You connect it to your Wi-Fi, after which the 5-in-1 Receiver then connects to the Gateway through Zigbee. You’re then free to use your smartphone as your controller, set up automations, use Alexa or Google to control your lights, and all sorts!
Powering Your LED Strip Lights
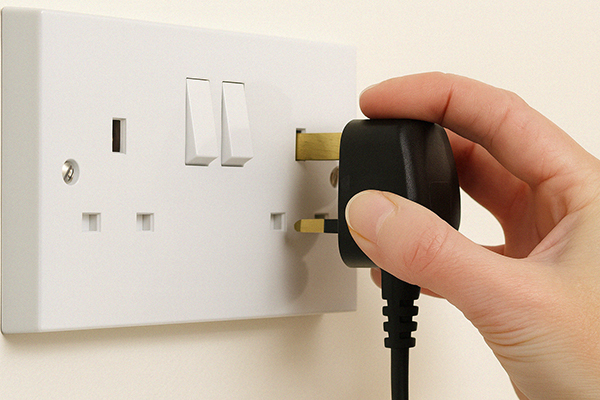
A necessary component in your strip lights installation is a power supply, also known as a driver. In essence what a power supply does is take the 240V electricity from your mains supply, and converts it into a lower voltage for your LED tapes, which generally run at either 12V or 24V.
You also need to know that every driver comes with a maximum load - this is the amount of electricity it can handle, and this is a key part of putting your strip lights together.
Luckily, it’s pretty easy to work out which driver you need. You simply take the wattage of your strip lights, and multiply it by the number of metres you want to run.
For example, let’s say you want 5 metres of our 8W Aon Tape to use in your living room.
The tape uses 8W per metre, and there are 5 metres, so we multiply 8 by 5, which gives us 40W. This means the power supply we use must have a max capacity of at least 40W.
We would recommend at this point adding a further 10% leeway onto this figure, so that we can safeguard the life of the tape and the driver itself, so this then becomes 44W.
Once we know what voltage we need, and the max load of the driver that we need, the only choice left is to pick between plugin and hardwired.
Plugin power supplies come with a 3-pin plug that you simply stick into your standard plug socket. Hardwired power supplies however need to be connected directly to your mains supply, which we’d strongly recommend getting a qualified electrician to do.
Either way, there is a port for both a plugin power adapter in the Easilight 5-in-1 Receiver we mentioned earlier, as well as V+ and V- terminals for the hardwired power supplies.
The Finishing Touch
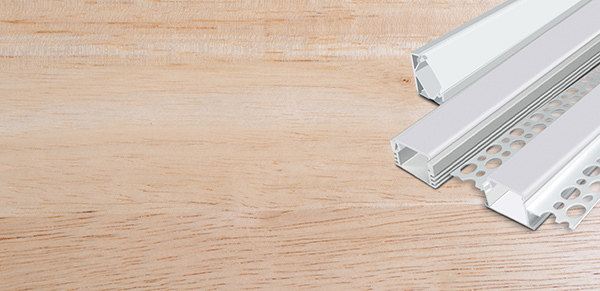
You’ve got your tape, a suitable controller, and the correct power supply. All that’s left to really give it that professional finish is an Aluminium Profile.
This is a thin strip of aluminium that your LED tape sits inside of. It’ll come with a diffuser, which hides the tape itself but still allows the light to shine through.
Not only does this make the tape look really premium and high end, but it also serves a practical purpose by helping extend the life of your tape by up to 50%!
It does this by acting as a heatsink, drawing excess heat away from the tape itself, and reducing the wear and tear on it.
There are a few types of Profile that you can get: surface mount, recessed, corner and plaster-in.
Surface mount profiles simply fit directly onto the surface where you want to use it, be it a wall, ceiling, kitchen cabinet etc.
Recessed profiles slot into channels made in your surface, and are a great way of streamlining your strip lights into shelves, tables and other similar spaces.
Corner profiles fit straight into 90 degree spaces, like for example where your two walls meet, or where your wall meets your ceiling.
Finally, plaster-in profiles slot into channels in your plaster-board, with the sides actually getting skimmed into your wall, giving you truly integrated LED strips in your space.
Naturally, which profile you pick will absolutely depend on where you’re planning on using it.
The Tiny Details
Lastly, you may need some Accessories to finish off your tape install, depending on the quirks of your setup. We’ll run through some of the more common accessories first.
Core Cables
Although you’ll get a short length of these with your tape anyway, you may well end up needing Core Cables. These are essentially lengths of cable that have varying numbers of ‘cores’ that allow you to connect your tape to your 5-in-1 Receiver.
As mentioned, you’ll get 10-15cm of core cable as standard with your tape, but if your mains connection is a little bit further from where your tape will actually be installed, then you may need extra core cable which we can solder onto the end of your tape.
The type of core cable needed differs with each type of tape…
Single colour tape requires 2-core cable…
Dual colour tape requires 3-core cable…
RGB colour changing tape requires 4-core cable…
RGBW and RGBWW colour changing tape requires 5-core cable…
And finally, RGB+CCT colour changing tape requires 6-core cable.
Connectors
Next up, we have connectors. These allow you to join two lengths of tape together in different ways without needing to solder them together.
So for example, if you need your tape to go round a 90 degree bend, like around the back of your TV, you can use a corner connector to do this.
Similarly, if you need to quickly join your length of tape to some core cable, you can use a ‘strip to wire’ connector to do so.
In essence, these are very small and very easy ways of connecting your strips to different things.
End Caps
End caps are pretty much what they say on the tin - they’re caps that fit onto the ends of your tape, and are essential for strips that are IP65 or IP67.
This is so that they can maintain their IP rating and remain water resistant. Needless to say, we apply silicone to these before we send them out, so that they’re professionally done.
If you’re not using IP rated tape, then there isn’t really any need for end caps, so these are more for niche use cases where your strips are being used in bathrooms or outdoors for example.
Putting Your LED Strip Lights Together
We’ve covered a lot of material and products over the course of this guide, and it can be a lot to take in if you’re new to LED strip lights.
If you still feel like you need more guidance, then don’t worry - our team of experts have decades of collective experience, and are more than capable of handling small queries or super large, complex installations.
No matter the size of your tape install, they’re more than happy to help on 0116 321 4120.
You can also get in touch with them on sales@wled.co.uk, along with any information you have about your space, such as floorplans, measurements, photos or anything else.
You can also reach out to us via our Facebook or Instagram pages too. Just pop us a DM, and for all things LED lighting, be sure to check out our YouTube channel.